44 how to make your own labels with tape
Creating your own LTO Labels - Data Backup - Spiceworks This process prints the first column of labels (16), and then you turn the sheet around for the second set of 16 labels. First, create a text file containing a total of 16 codes you want to print on your labels. The normal format for LTO labels is 6 characters (your choice) followed by 2 characters for the format of the tape (ie:L4 for LTO 4 ... Make your own Product Tags for Handmade Items - A HAPPY STITCH 4. Let the logos cool completely. Don't cheat, if it isn't cool, it won't work as well. Peel off the paper to reveal your very own adorable custom product tags! Hey rockstar! The world can see you now! 5. To use your lovely creation, clip each one. Now you can fold them in half and sew them into your next project.
Tape Label Generator | BedroomLAN Choose your tape type. Click on the label in the preview and enter the first label to print. The label should include at least one digit. The first sequence of digits will be the serial number. Choose the colours for the label prefix and suffix, the text before and after the serial number. Neither prefix nor suffix are mandatory.

How to make your own labels with tape
How To Create Transfer Tape Labels. Amazing DIY! So let's get started with the instructions! The first thing you will need to do is: 1 - Decide what you want to label. Get them all organized. 2 - Clean the surfaces of all debris. You don't want to place the labels on greasy canisters. 3 - Have a program installed like Adobe Photoshop, Microsoft Word, or any text editor that you can print from. How to Make Your Own Washi Tape DIY - The Graphics Fairy DIY Washi Tape - Oiling the paper to bring sheerness. Lay your printable on your table (place a protective sheet underneath) and start to gently rub the oil into the paper using your fingertips. Gradually rub with light linear or circular strokes and add small amounts of oil until all the surface of the paper is covered. DIY: Make Your Own Clothing Labels : 5 Steps - Instructables Step 2: Create & Print Your Design. Create your design on the computer. I used MS Word to make a basic colored text design. Test print the design onto paper first. Once satisfied, print the design onto your fabric sheet (on the fabric side). You may want to start with just 1 or 2 labels until you get the hang of this, so you don't waste any of ...
How to make your own labels with tape. How to Make Your Own Clear Labels for Pantry Jars...from Packing Tape! I attached packing tape to the front of the labels, pressing down on the ink with a credit card to transfer the ink from the paper, to the tape. At this time, you can cut out the tape with the paper attached to the size you would like them to be. Then, I placed the tape with the paper attached in a bowl of warm water. DIY Custom Labels | Custom Adhesive Labels & Tapes Chroma Customs is the future of customized stickers and labels. With tons of shapes and materials to choose from for your next DIY custom label project, this online service allows you to design your very own custom adhesive labels. Our service also allows you to upload your logo or image for optimal customization. How to Make Fabric Labels Video Tutorial - Easy Sewing For Beginners Take one of your labels and place it printed side down onto the cotton tape or ribbon. Ensure you have your label on a solid heat proof surface and not an ironing board. An ironing board will be too soft. Slowly iron the label onto the cotton tape or ribbon, holding in one position for 3-4 seconds before moving the iron on. Step 6 How to Make Tape (with Pictures) - wikiHow Wrap the tape around a cut-to-width paper towel roll tube. Use scissors to cut an empty paper towel roll tube into several smaller tubes. Make each one no more than 0.5 in (1.3 cm) wider than your tape strips. Then, wrap each strip of your decorated tape around one of these tubes, with the waxed paper side down. [6]
The Easiest Way to Make Clear Stickers - DIY Clear Labels for Jars Print your label or design on a printer. Cut out your label Step 2 Take your packing tape, and tape the cutout label onto the sticky part of the packing tape Step 3 Cut off the packing tape/label from the tape roll Step 4 Cut the excess tape around the label so that there is no longer any sticky tape exposed. 4 Ways to Make Stickers - wikiHow Rub the front of the stickers. Use a penny or your nail to press on the front of the stickers and rub the surface, so that the tape starts to bind with the ink on the paper. Continue for a couple of minutes to ensure that the ink and the adhesive become one. 4. Run the stickers under warm water. Easy Way to Make Clear Pantry Labels (& Printables) Step 4: Now, scrape! Use that same credit/gift card and, paper side-up, gently scrape off the paper. The ink should stay on the tape and the tape will still be sticky enough to use as a label. The harder you scrape, the more likely it is for the ink to start coming off (which is not necessarily a bad thing if you want a more weathered look). How to Make Clear Stickers - DIY Transparent Labels - YouTube Clear labels are quite pricy but it's possible to make your own at home using packing tape. It's a really cool, inexpensive and simple DIY image transfer tec...
DIY Hack to Make Labels with Packing Tape - Pinterest The Easiest Way to Make Clear Stickers - DIY Clear Labels for Jars. This image transfer teqhnique can be used for gift tags, used on fabric, for baskets, for bins, for plastic. Includes free printable sheet of pantry labels so you can use in your own home. We used a handwritten type font so the labels have a decorative flair! S Shanty-2-Chic DIY Fabric Labels on Twill Tape - Jennifer Maker Make your own DIY fabric labels, printed right on twill tape with your inkjet printer! This is the perfect way to personalize a gift or make a brag tag! The other day I read this quote: "The greatest gift you can give someone is the gift of your time because when you give your time you are giving a portion of your life you can never get back." Free Online Label Maker: Design a Custom Label - Canva To print your own labels at home, simply load the label paper into your printer and hit print. If you're using an inkjet printer, load the paper with the label side facing down. If you have a laser printer, load the tray with the label side facing up. What should I put on a label? A label should include: the product name the company logo or icon How to Make Fabric Labels at Home - YouTube shows you how to make fabric labels at home - washable and durable! I've tested the many methods for this and this is t...

Glasmarker selber basteln - Einfache Ideen und Anleitungen
Packing Tape Image Transfer & DIY Clear Labels - A Piece Of Rainbow Step 2: Pin it! Take a piece of tape, press the sticky side onto an image, center the packing tape over it evenly and press. Then cut out the section. Pin it! Here's a REALLY IMPORTANT part of the image transfer process: burnish the piece using the back of a spoon and make sure to cover all the printed areas.

Label Maker Tape - Pack 3 | Craft Office Stationery Organise | Neat Freak | Neat Freak
How to Make Clothing Tags - 4 Options - Melly Sews 1. Stamp Your Own. Using stamps and permanent ink is probably the easiest way to make labels for clothes. It can also be a fun way to let kids personalize their own tags. Use a permanent ink, not a water based ink. I bought the pad above in a big box store a few years ago, but as you can see the ink is fading.

Cool griptape art
DIY Fabric Labels on Twill Tape - Pinterest How to make your own DIY fabric labels by printing directly onto twill tape! All you need is an inkjet printer, card stock, masking tape, twill tape, and ... Jennifer Maker ️ DIY Home Decor + Craft + Paper Flowers 207kfollowers More information

Is It Cheaper To Print Your Own Labels in 2021 - Galeon
DIY Printable Fabric Labels - You Make It Simple How To Apply DIY FABRIC Labels to Your Sewing Projects / 5 Simple Methods Watch on Sew the label into the seam of the project. Fold the label strip in half and with the raw edges of the ribbon facing out past the seam allowance as shown in the picture above. Topstitch around the edge of the label using a small zigzag stitch on your sewing machine.

How to Create Clear Labels With Packing Tape / Useful DIY - YouTube
DIY Stickers: 3 Ways How to Make Homemade Stickers The next step is to use your packaging tape (also known as shipping tape) and place that on the wax paper with the sticky side down. After you've completed that step, the next thing to do is create your sticker layout and design. Be sure to lay down all of the elements that will make up your sticker.

bagladee...: Tutorial : How to make your own labels
Make your own clothing labels using stamps - Blueprints For Sewing 3. You can also use any plain woven fabric. Light colors and tight weaves (like poplin, voile, or shirting) work best. Trim the edges with pinking shears, cut on the grain and pull away some threads to create a fringe, or finish the edges with a serger. Press your fabric to get it nice and smooth before stamping. 2.

How To Create Transfer Tape Labels. Amazing DIY!
Make Your Own Labels Free and Without a Label Maker Place the label on the aluminum strip so that the distance to the edge of the strip is at least 1/8 in. all the way around. The long side of the label should be parallel to the long side of the strip. Cut off a piece of the packing tape that is a bit longer than the aluminum strip.

How to Make Packing Tape Labels for Kitchen Organization | Kenarry
LTO Barcode-Label-Generator This is a free online generator for LTO Ultrium Tape Barcode Labels. Usage: Just fill in the form and click on Generate my labels . Unless you hit a limit mentioned below under Restrictions a PDF file will be downloaded which contains your generated Labels. Print this file on your adhesive labels without scaling or page fitting.

How To Make Simple Printed Labels Using Packing Tape
How to Make Cassette Tapes | 2021 [Free Guide] - Other Record Labels Make both sides equal length. Don't forget that you can't make one side of your tape longer or shorter than the other! You can rearrange the track-listing or add a b-side to the end of the album in order to ensure that there isn't any dead space at the end of one side! Make them your own!
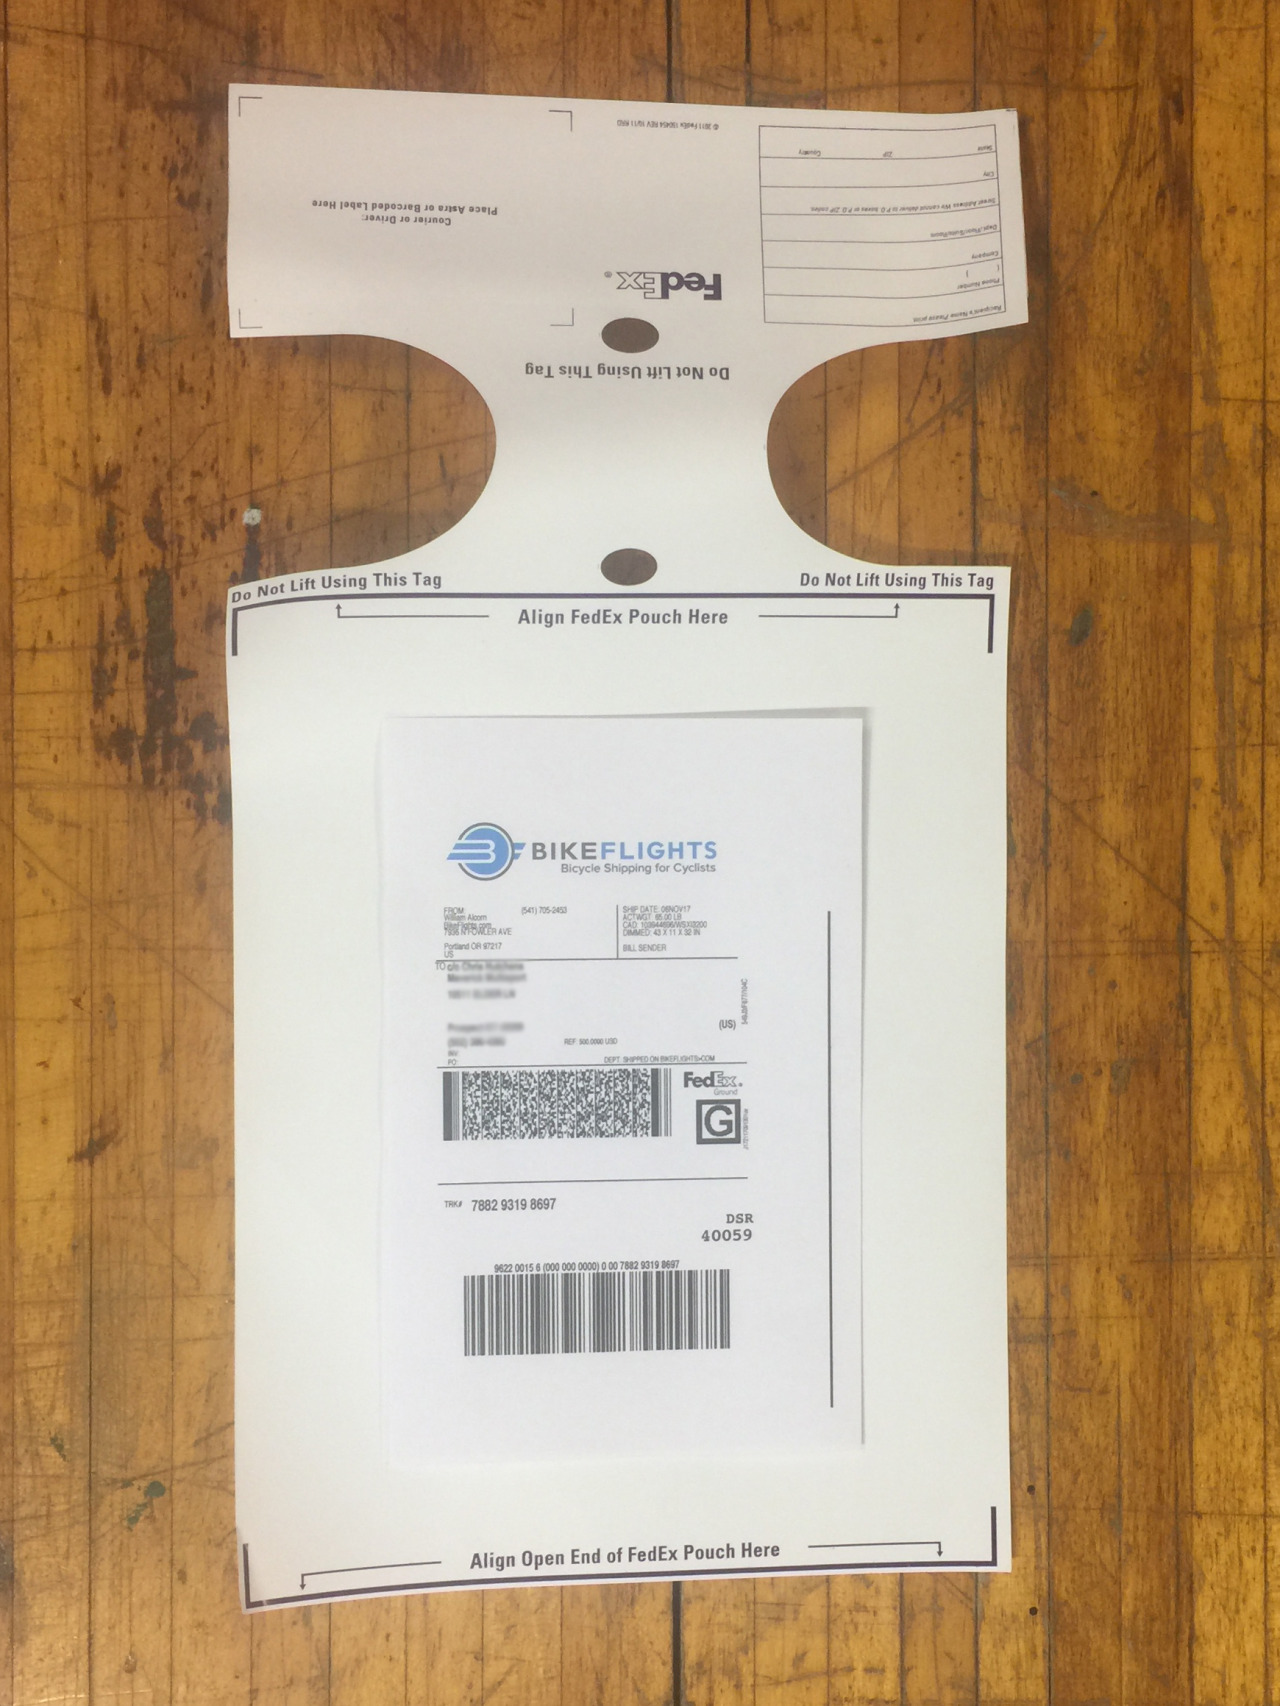
How To Properly Label Your Bike Case For Shipping - BikeFlights.com
How to Make Your Own Clothing Labels - Instructables 1. stencil of your logo 2. spray paint (and gloves) 3. grossgrain ribbon or some other tape 4. scissors 5. iron The way it works: Once you have a stencil and your ribbon, you'll be spray painting through the stencil to get your tags. It's easy! Snapshot 2010-01-01 17-55-05.tiff Download Add Tip Ask Question Comment Download

DIY Packing Tape Labels and more | Chatter Gal
DIY: Make Your Own Clothing Labels : 5 Steps - Instructables Step 2: Create & Print Your Design. Create your design on the computer. I used MS Word to make a basic colored text design. Test print the design onto paper first. Once satisfied, print the design onto your fabric sheet (on the fabric side). You may want to start with just 1 or 2 labels until you get the hang of this, so you don't waste any of ...

The Real Housewife of Tazewell County: DIY Truffula Trees or Truffula Flowers (Dr. Suess' The Lorax)
How to Make Your Own Washi Tape DIY - The Graphics Fairy DIY Washi Tape - Oiling the paper to bring sheerness. Lay your printable on your table (place a protective sheet underneath) and start to gently rub the oil into the paper using your fingertips. Gradually rub with light linear or circular strokes and add small amounts of oil until all the surface of the paper is covered.

Make Your Own Inkjet Printable Vinyl Stickers - YouTube
How To Create Transfer Tape Labels. Amazing DIY! So let's get started with the instructions! The first thing you will need to do is: 1 - Decide what you want to label. Get them all organized. 2 - Clean the surfaces of all debris. You don't want to place the labels on greasy canisters. 3 - Have a program installed like Adobe Photoshop, Microsoft Word, or any text editor that you can print from.

System Administrator's Guide Red Hat Enterprise Linux 7 Administrators en US

IDS, Inc.: Make it Mondays: Indoor Fort Building Kit

DIY Packing Tape Labels: How To Make Your Own Clear Printed Labels | Diy labels, Printing labels ...

DIY Labels: How to Make Clear Labels with Packing Tape & Paper - Parent Vault: Educational ...
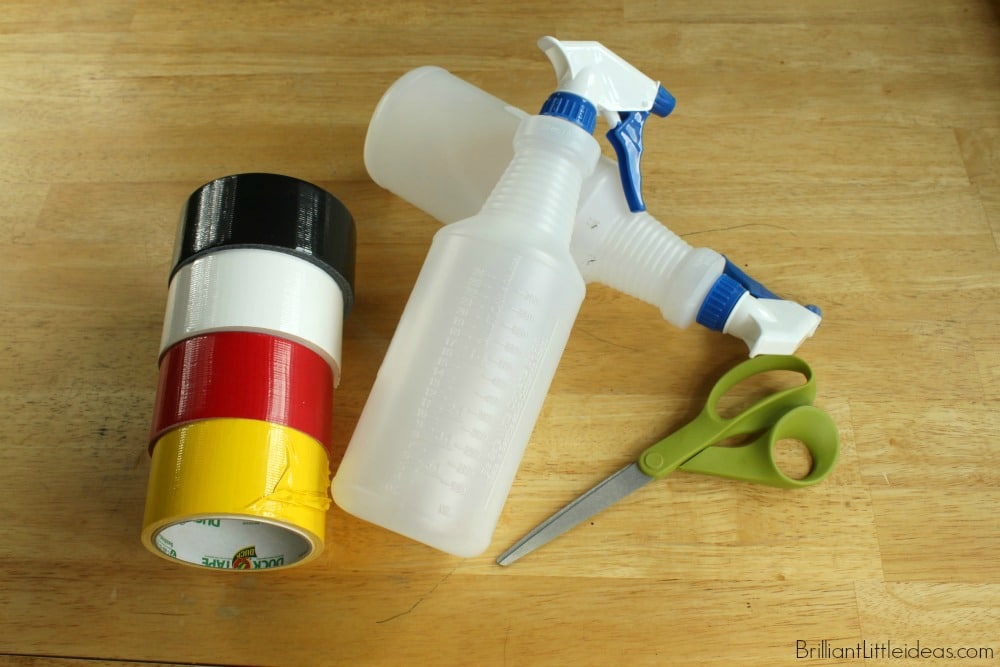
DIY Fire Extinguishers | Brilliant Little Ideas
Post a Comment for "44 how to make your own labels with tape"